In this tutorial, we’re going to show you how to connect to a VPN on Ubuntu. Beginner-friendly, step-by-step instructions with screenshots.
Before we begin
You can always connect to a VPN using the VPN provider’s client app (if they have one). This tutorial will show you how to use Ubuntu’s built-in VPN feature that allows you to connect to a VPN straight from the system itself, without the need for a client app. It’s what I prefer using instead of a client app. It’s more seamless for my simple use case.
Some people may assume that you won’t need to use a VPN on Linux because it’s considered more secure. However, there are always use cases for a VPN, regardless of what OS you are using.
You’ll need to have a VPN – either set up your own or buy one. There are lots of providers to choose from. Some websites (like this one) do detailed comparisons and reviews of the best Linux VPNs, so that example will help out in your choice.
Once you get a VPN, you can follow the steps below and start the tutorial.
Step 1: Find the VPN Settings page
Open up Settings and click on the Network tab. This is where you’ll find the VPN page.
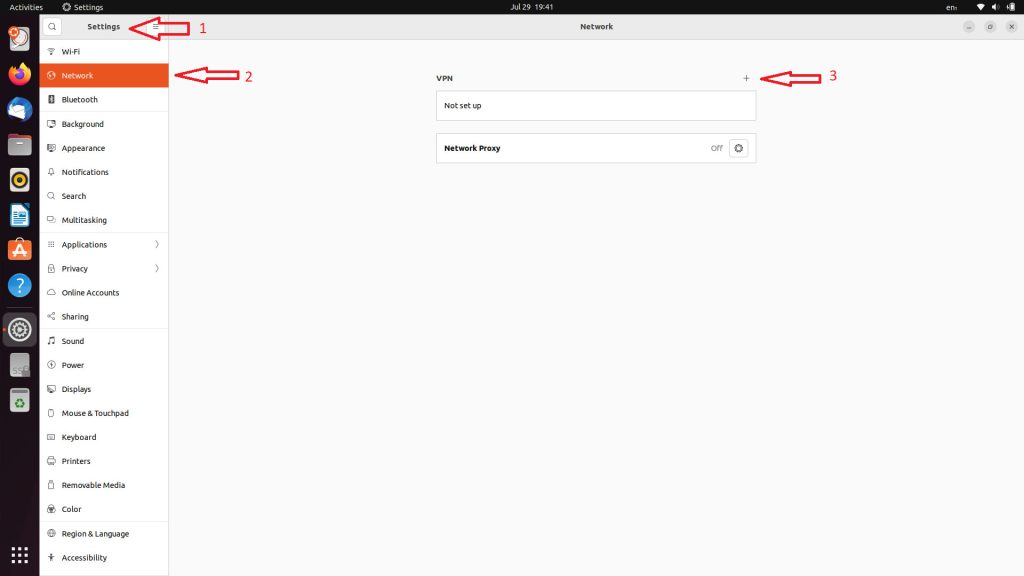
To start setting up your VPN, you need to click on the + button.
Step 2: Add and set up the VPN
Once you click on the + button, you’ll get a pop-up window with 3 options:
The most commonly used options are OpenVPN and just importing from a file.
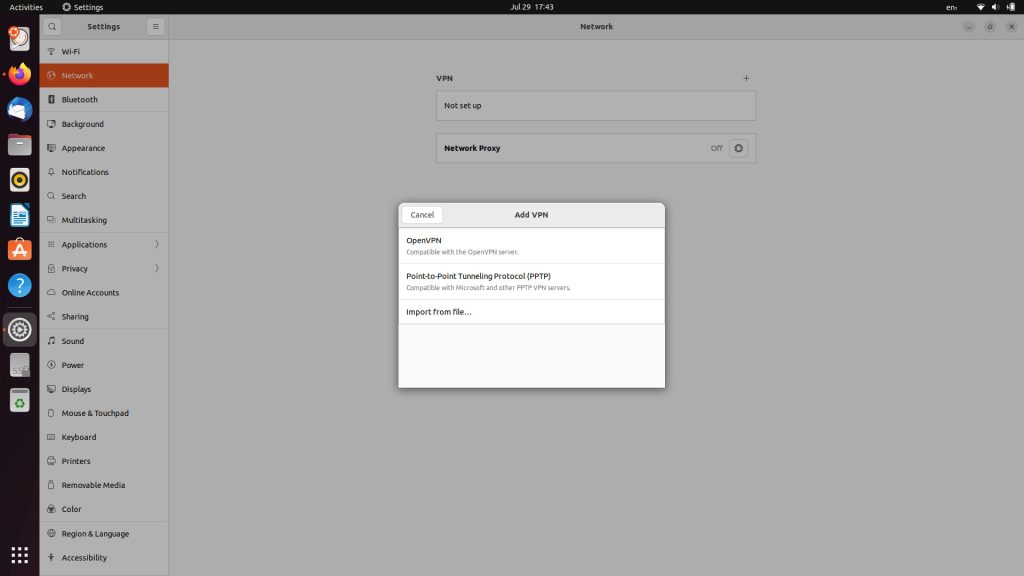
In most cases, VPN providers have a file you can download and then import using the third option. Check your VPN provider’s dashboard, check your emails, or just contact them asking for a file you can use. You’ll also need to note your username and password, you can find them in the same area where you’d find the VPN file.
Once you import the file, you’ll need to also add the username and password.
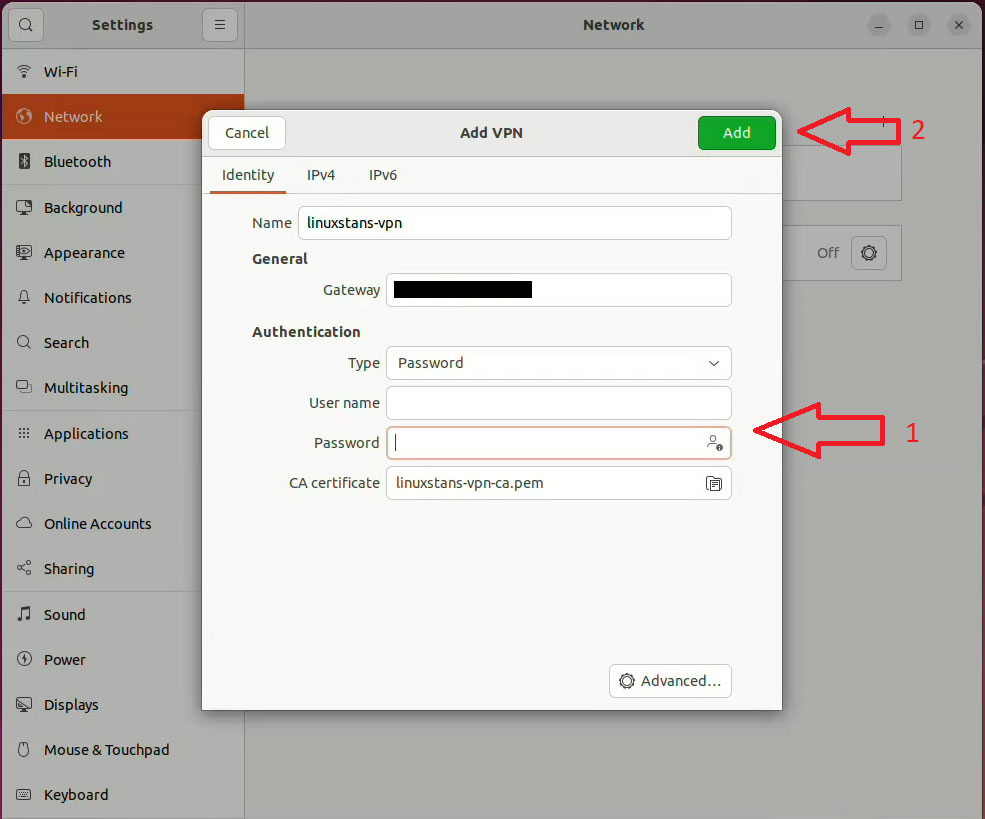
Add the authentication details and once done, click on the green “Add” button.
Step 3: Start using the VPN
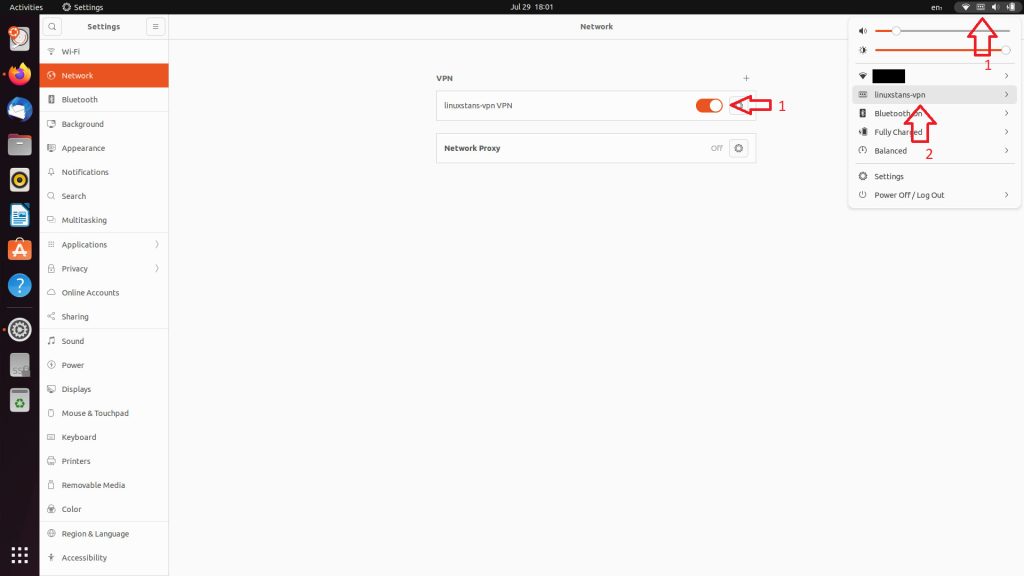
Now that the VPN is set up, you can start using it. To turn it on, either use the VPN settings page and click on the gray toggle or use the system menu from the top bar (which is easier) and turn it on from there.
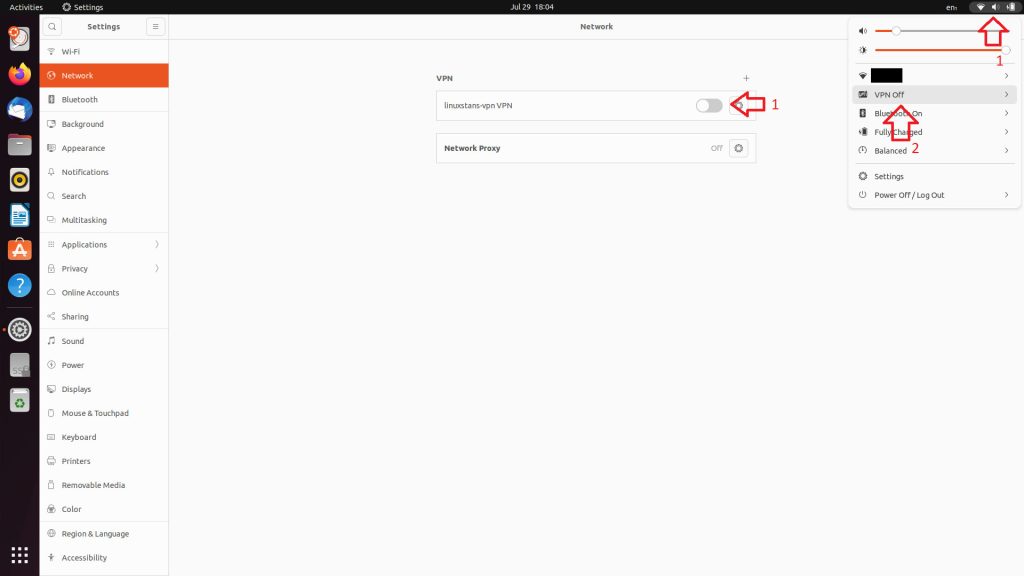
To turn the VPN off the same way you turned it on, either from the VPN settings page (click on the orange toggle) or from the system menu (click on the VPN name and then click on Turn Off)
Step 4: Configure the VPN
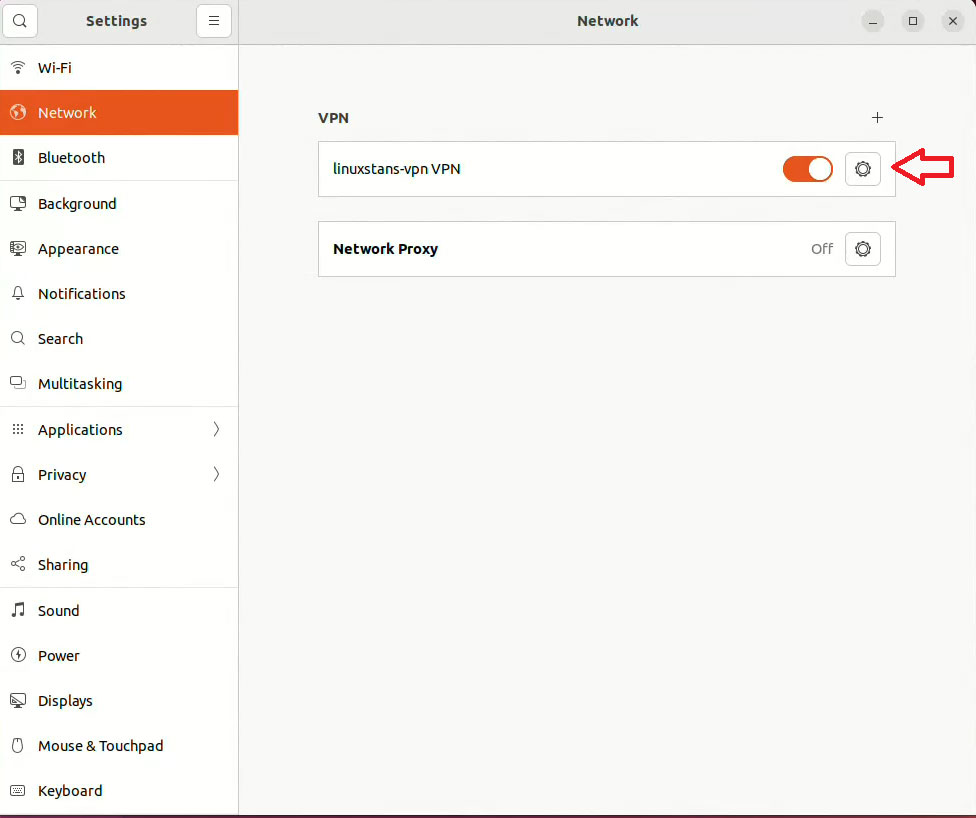
If you want to configure the VPN you’ve already added or adjust some settings, you can do it by clicking on the cog icon/button from the VPN settings page.
More details about a VPN on Ubuntu
If you want to add another VPN, just follow the steps in this tutorial again. You can add as many VPNs as you want to.
To remove a VPN, click on the Cog icon/button and remove it from there.
If you’re using a client app from the VPN provider, none of these settings or steps apply to you. The client app will have its own instructions and way of setting it up. Most Linux VPN client apps are simple. In most cases, you just need to install the app, enter your username and password, and connect to a VPN from a large number of available locations/servers.
This tutorial is really handy if the VPN provider you’re using doesn’t have a client app.
If you can’t find any of the steps or settings from this tutorial, you may not have Network Manager installed. You can install it by running:
sudo apt-get install network-manager
Although NetworkManager is installed by default on most Ubuntu distros.
If you have any questions, leave a comment below.
As a seasoned IT professional with a deep understanding of networking and Linux systems, I've been actively involved in configuring and managing VPNs on various platforms, including Ubuntu. Over the years, I've successfully implemented VPN solutions for both personal and professional use, enhancing security and privacy in different computing environments.
Now, let's delve into the concepts covered in the provided tutorial:
-
VPN Basics:
- A VPN (Virtual Private Network) is a technology that allows users to establish a secure connection over the internet, providing privacy and anonymity by encrypting the data that is transmitted between the user's device and the VPN server.
-
Ubuntu's Built-in VPN Feature:
- Ubuntu, being a popular Linux distribution, comes equipped with a built-in VPN feature. This eliminates the need for third-party client applications and allows users to configure and manage VPN connections directly through the system settings.
-
Reasons for Using VPN on Linux:
- Contrary to the misconception that Linux is inherently more secure, there are still valid use cases for employing a VPN on Linux systems. VPNs offer an additional layer of security and privacy, particularly when connecting to public Wi-Fi networks or accessing geographically restricted content.
-
Choosing a VPN Provider:
- The tutorial emphasizes the importance of having a VPN subscription from a reliable provider. It suggests exploring detailed comparisons and reviews of Linux VPNs to make an informed choice. This highlights the significance of selecting a provider based on factors such as security protocols, server locations, and user reviews.
-
Setting Up VPN on Ubuntu:
- The tutorial provides a step-by-step guide for configuring a VPN on Ubuntu. It covers actions such as accessing the VPN settings page, adding a new VPN connection (OpenVPN, PPTP, or importing from a file), and entering authentication details such as username and password.
-
Starting and Stopping the VPN:
- Once the VPN is configured, the tutorial explains how to activate and deactivate the VPN connection. Users can toggle the VPN status either through the VPN settings page or the system menu for convenience.
-
Configuration Options:
- The tutorial touches upon configuring an already added VPN by accessing the settings through the cog icon/button on the VPN settings page. This allows users to make adjustments or add multiple VPN connections based on their requirements.
-
Network Manager Installation:
- In case users encounter difficulties with the steps outlined in the tutorial, it suggests checking for the presence of Network Manager. If not installed, users are advised to install it using the provided command (
sudo apt-get install network-manager). However, it notes that NetworkManager is typically installed by default on most Ubuntu distributions.
- In case users encounter difficulties with the steps outlined in the tutorial, it suggests checking for the presence of Network Manager. If not installed, users are advised to install it using the provided command (
-
Additional Information:
- The tutorial provides additional insights, such as the ability to add multiple VPNs and remove them using the cog icon/button. It also clarifies that if users are utilizing a client app from the VPN provider, the tutorial's steps do not apply, as the client app will have its own setup instructions.
-
User Support:
- The tutorial encourages user interaction by inviting questions or comments for clarification, promoting a supportive community for those following the guide.
In summary, the tutorial serves as a comprehensive guide for individuals looking to set up and manage VPN connections on Ubuntu, catering to both beginners and those with prior Linux experience.